Mostrando entradas con la etiqueta halloween. Mostrar todas las entradas

jueves, 30 de octubre de 2014

Halloween Collab with Rouge!

Hola a todos!

Este Halloween hemos unido fuerzas Rouge y yo para hacer una nueva colaboracion! Ella ha creado unas manicuras geniales para Halloween y yo he recreado el look de Morticia Addams, que estara en su blog. No os lo podeis perder!

Os dejo con ella =D.


Hello everyone! I have some super simple nail art ideas you can try to get into the Halloween spirit. I head that this holiday isn’t that popular in Spain. Don’t worry you can still participate! All you need is a couple of nail polishes to set the mood. The colors you need for these looks are black, white, orange and a color of your choice, I went with a  berry shade.

Hola a todos ! Tengo algunas ideas muy fáciles de nail art para entrar en el espíritu de Halloween . He oído que esta fiesta no es tan popular en España . No te preocupes que aún todavía puedes participar ! Todo lo que necesitas es un par de esmaltes de uñas para establecer el estado de ánimo . Los colores que necesitas para este diseño son negro, blanco, naranja y un color de tu elección, yo elegí un granate .

The first look is the classic statement nail. This is becoming a very popular look. The idea is to paint all your nails one color. Then one nail is something completely different. Taking this idea in mind. I painted all my nails a berry color; this is shade DeAnn from Julep.  Then I used the shade Cleopatra on my ring finger. After this had all dried I drew a cobweb on the nail with the black polish on it. The way to draw the cobweb is super simple. Start off with a nail pen and draw a line diagonally across your nail and then create more lines from the vantage point. Then once the lines are drawn vertically fill them in giving the effect of a web. It is a very simple design to do when you do not have too much time. Also it is a very way to say festive.
El primer diseño es el clásico con la uña de "acento" . Este se esta haciendo un look muy popular. La idea es pintar todas las uñas de un solo color. Y entonces, una uña es totalmente diferente. Teniendo esta idea en mente, 'pinté todas las uñas de un color granate ; este es el tono DeAnn de Julep . Luego usé el color Cleopatra en mi dedo anular . Después de que todo estuviera seco, dibujé una telaraña en la uña con el esmalte negro en él . La forma de crear la telaraña es súper simple. Comienza con un esmalte de boli y dibuja una línea diagonal a través de la uña y luego crear más líneas desde el punto de vista. Entonces una vez que se dibujan las líneas, rellenalas de manera horizontal creando mas lineas y así dar el efecto de una telaraña. Es un diseño muy simple de hacer cuando no tienes demasiado tiempo . También es muy festivo.


The second nail look is a stitched Frankenstein type look. Also this look is very simple. First start out with clean nails. Nails should be cut square to make them fit the look better. Start out by painting the tips of your nails orange. Then once that dries take a black nail polish and draw a thin line where the orange ends on your nail. After that has dried draw small horizontal lines connecting the black and orange. This will give the stitched look.

El segundo diseño de uñas es tipo Frankenstein cosido. También es un diseño muy simple. En primer lugar, empieza con un esmalte del tono de tu uña . Las uñas deberían tener un corte cuadrado para que quede mucho mejor el diseño. Comienza pintando las puntas de tus uñas con naranja. Luego, una vez que se seca, coge un esmalte de uñas negro y dibujar una línea fina donde termina el color naranja. Después de que se haya secado dibuja pequeñas líneas horizontales que conectan el negro y naranja . Esto le dará la aspecto de cosido .


I hope you have enjoyed these nail art looks. I prefer to do nail arts that do not take too much time and still look great. I have a Pinterest Board with more Halloween inspired ideas http://www.pinterest.com/rougesalvatore/all-hallows-eve/ . There you can find more ideas for Halloween.

Thank you to Lor for giving me this chance to guest blog!

Espero que os hayan gustado estos diseños de uñas. Prefiero hacer estos diseños que no toman demasiado tiempo y quedan muy bien . Tengo Pinterest con más ideas de Halloween inspirados http://www.pinterest.com/rougesalvatore/all-hallows-eve/ . Allí puedes encontrar más ideas para Halloween .

¡Gracias a Lor por darme esta oportunidad de ser un blog invitado !

Xoxo Rouge

Instagram:@rougesalvatore
Twitter:@rougette66

martes, 28 de octubre de 2014

Halloween: Silver Stitches Nails

Hola a todos!
Hoy os traigo una manicura muy simple, fácil de hacer y creo que bastante llamativa.
Empecemos!

Hi There!
Today I´m here with a very easy to do and very catchy manicure. Let´s get started!


Primero, preparar las uñas. Limar a vuestro gusto, aplicar una prebase y dos capas de un esmalte color plata (o de un color que os guste y pueda combinar con Halloween).
First, get your nails ready: file them, apply a base coat and when it dries, two coats of a silver nail polish (or any other color that you like for Halloween).


Después, con la parte mas fina del punzón, iremos cogiendo esmalte negro y trazaremos líneas cruzando la uña, no tienen que estar perfectas en absoluto!
After that, with the skinny part of the dooting tool, pick some black nail polish and create some horizontal lines on your nail. It doesn´t have to be perfect at all!


Y para terminar, con el borde del palito de naranjo, vamos haciendo las líneas verticales a las horizontales que hemos hecho antes (que no sean demasiado largas, para que no se os junten). Aplicamos un top coat, limpiamos los bordes y listo.
To finish, with the edge of the woodstick, draw some vertical lines on top of the other we just made again using black and be careful to don´t do them so long, they will get together with the next line. Clean your nails, apply top coat and we´re done.

Aquí teneis la manicura finalizada. Espero que os guste!
Here´s the finished manicure, hope you like it!


Lor.


lunes, 27 de octubre de 2014

Halloween: Creepy Black&White Pumpkin Look

Hola a todos!

Como estáis? Dado que se acerca Halloween de manera inminente, hoy me he puesto manos a la obra para hacer este look. Me he inspirado en las típicas calabazas que los americanos suelen poner en las puertas de sus casas y les hacen esas caras tan tétricas.

Hello there!
How you doing? Because Halloween is coming, it was the right time to start with makeup inspired looks. I got inspired with the typical pumpkins, but I created my black&white version.
Let´s get started!

Es muy fácil, y lo podéis hacer con productos que tenéis y usáis muy frecuentemente para maquillaros.
It´s so easy and you can use products that you use almost every day in your makeup.

Primero aplique mi base normal, y para aclararla usé el lápiz jumbo de Nyx en Milk. Fui haciendo lineas por toda la cara y difuminando con la brocha que apliqué la base hasta que conseguí la palidez que buscaba. Podeis usar base blanca, pero si no teneis, esto es una buena opcion.
First I applied my foundation, and then with the jumbo from Nyx in Milk, I added white all over the face until I got very pale. You can use white foundation, but this is a great trick if you don´t have one.


Despues, con la brocha Pro-37 de Burlesque y sombra negra (esta vez usé Black Dog de Urban Decay) rodeé los ojos y fui rellenando hasta crear un circulo. Después, con la brocha Fine Liner Brush de Real Techniques y eyeliner negro repasé los bordes y creé dos puntas en la parte superior de las cejas, y en la parte inferior de las ojeras y lo rellené con la misma sombra negra.
After, with the Pro-37 brush and black eyeshadow (Black Dog from Urban Decay, one of my faves!) I circled my eyes and filled them with black. With the Fine Liner Brush by Real Techniques and some eyeliner, I went over the edges and added some points on top of my eyebrows and on the lower part of my eyes.


Ahora, pasamos a la boca. Con la brocha #13 de Chocolate fui trazando picos tanto por encima y por debajo del labio, para crear más o menos la misma forma que tienen las calabazas. También rellené el labio completo con eyeliner y después lo fijé con la misma sombra negra de antes.
Now, on the mouth it´s so easy too. I took my #13 brush from Chocolate and started creating spiky points with the black eyeliner, and then filled all my lip area with it, more or less with the same shape that the pumpkin´s mouth have. And set all that with the same black eyeshadow from before.


Con la brocha Pro-37 de Burlesque difuminé un poquito todas las puntas, porque no quería un acabado perfecto.
Again using the Pro-37 brush, I blended the edges of the mouth and the eyes to give a blurry and imperfect finish to the look.


Para terminar, marqué bastante el pómulo con la brocha Pro-03 de Burlesque y una sombra de tono gris (Copperplate de MAC). Y fijé suavemente los espacios blancos con los polvos All About Matte de Essence.
I contoured my cheeks more than usually with a grey colour (Copperplate from MAC) and I used my Pro-03 Brush from Burlesque. To finish the look, I put some powder on the white areas to avoid any shine, and we´re done.


Todos los productos!/ All products!


Este es el look final!
This is the final look!


Para dar mas miedo, os recomiendo poneros un pañuelo que os tape el pelo y vestiros totalmente de negro.
To scare the hell out of people, wear a black scarf around your hair and full black outfit. I promise it will work.


Nos vemos en el próximo post!
See you on the next one!

Lor.


lunes, 14 de octubre de 2013

Purple Masquerade

Hi there!

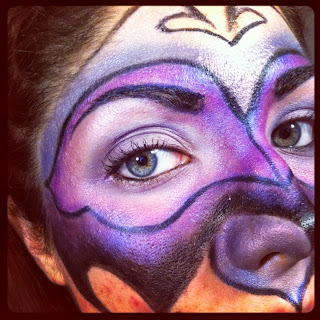
Today I´m going to tell you how I did my Purple Masquerade, a very easy look for Halloween. The only thing you need is time, because it takes a while to do it, but after, the result is totally amazing!

The first thing I did for creating this look was draw the lines of the masquerade with a light blue pencil (you can use any color, but I recommend you to use light colors like white, light blue, because they´re easy to cover later with black) so if you make any mistake, you can easily take it off and start again. You can create any design you want, like, and if you need inspiration, google is a very good source of it!


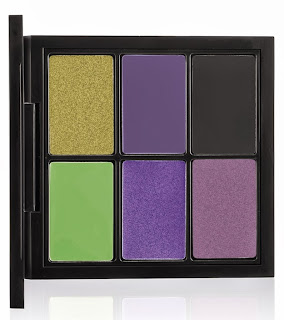
Later with some black aquacolor by Grimas and my 209 brush by MAC I followed the blue lines, making a thick line. After that, I took some black eyeshadow (Noir) from my Bad Girl palette of Sleek Makeup and started building the color, from the bottom of the masquerade to the top (I used an angled brush by Real Technicques and then a normal eyeshadow brush to apply it). Blended with the black, I put some purple from my Inglot palette, with a clean brush. Make sure all the colors blend together!


Then I put some purple eyeshadow by MUA all over the black line that surrounded the eyes,but not so much. With a big shadow brush I applied some Parfait Amour all over my lid and lower lash line and blend the edges with some Vellum eyeshadow. And for blendin the purple on the edges with Vellum I used Da Bling shadow and a blending brush. I filled my eyebrows with a black pencil.


(purple: Parfait Amour, Pink: Da Bling and White: Vellum)


For the top part of the masquerade I used Parfait Amour and on the end in my forehead, I put Vellum, like a transition from dark to light color.

Probably you will have to put some black again on the lines, so take your brush and later put some black shadow to set the aquacolor. Don´t forget to put some mascara if you´re not using falsies!


You can put if you want rhinestones, glitter, any kind of decoration that you like, but I wanted to make it like a simple option for Halloween.

I hope you like it, see you on the next post!
Lor.

--------------------------------------------------------

Hola a todos!

Hoy os voy a contar como hice la Máscara Veneciana que os enseñé el otro día. Es un look bastante sencillo para Halloween, lo único que necesitáis es un poco de tiempo y paciencia, pero el resultado merece totalmente la pena!

Lo primero que hice, fue con un lápiz azul clarito (cualquier color claro os vale, blanco, un azul como el mío, porque después con el negro que vamos a usar, quedará cubierto) marcar el diseño de la máscara. Y si en algún momento cometes un error, puedes borrarlo sin dejar marca. Podéis crear cualquier diseño que queráis, que os guste... Y si necesitáis algo de inspiración, google siempre viene genial! Yo estuve viendo unas cuantas fotos antes de decidirme mas o menos como hacer el diseño.

Ahora viene la parte mas o menos mas complicada del look. Con aquacolor en negro de Grimas y la brocha 209 de MAC, fui repasando todas las líneas que había dibujado con el lápiz, para ir dando forma a la máscara. Y luego con una brocha sesgada de Real Techniques y sombra negra (de la paleta Bad Girl de Sleek Makeup) fui rellenando la parte inferior de la máscara. Con una brocha grande de sombra y el color morado de mi paleta de Inglot, lo fundí bien con el negro y rellené el espacio que quedaba libre hasta la siguiente línea. Asegurad que los colores estén bien fundidos y no se vea ningún corte brusco de color.

Con una sombra morada de MUA, apliqué el color alrededor de la línea que limitaba los ojos. Y con lápiz negro rellené mis cejas. Con una brocha grande para sombra apliqué por todo el parpado y la línea inferior de pestañas la sombra Parfait Amour y para eliminar cualquier corte, difuminé los bordes con la sombra Vellum. El espacio que quedaba entre el color Vellum y el morado de MUA lo difuminé usando la sombra Da Bling. Delineé la línea interior de pestañas en negro, y puse solo una capa de máscara de pestañas. Podéis usar pestañas postizas si lo preferís.

En la parte superior de los ojos, apliqué la sombra Parfait Amour, y la difuminé hasta lo que quedaba por rellenar con color, con la sombra Vellum de nuevo.

Repasé las líneas negras para intensificarlas de nuevo con el aquacolor y puse sombra negra encima para fijarlo.

Si os gusta, podeis poner cristales, purpurina, cualquier adorno que os guste. Yo no usé nada porque quería mantenerlo como un look simple para Halloween pero igualmente colorido.

Fotos, como siempre, un poquito más arriba.

Espero que os guste el post, nos vemos en el siguiente!
Lor.

sábado, 12 de octubre de 2013

Sneak Peek...

Hi everyone!

Here I leave you a Sneak Peek of my next post, coming soon!


Hope you like it! See you on the next one =D

---------------------------

Hola a todos!

Aqui os dejo un adelando de mi siguiente post...

Espero que os guste!! Foto, un poquito mas arriba, como siempre.

Nos vemos en el siguiente,
Lor.

jueves, 10 de octubre de 2013

The Zombie Mouth!

Hi there!

Well, we are very close to Halloween, so here I going to give you a tiny idea for a very easy Halloween look.

You will need:
Foundation: I really recommend you to use a very thick foundation, something for example like paint stick foundation, or any kind of full coverage foundation. But for this kind of looks, it´s so much better to use the paint sticks. The shade that I use is one tone more pale than my own skin color.
Blood: any kind of fake blood that you already have, the one that you prefer to use, on your choice. I like the Grimas Filmblood B, a dark red colored one. And some aqua color in black.


Sponge: you will need this to apply the blood and the paint stick.


Contour: I used for creating some dark circles some red, purple and turquoise eyeshadow, and some brown to contour the face.


Loose podwer: to set everything.


A palette. This is optional, but very comfortable for putting the blood. And some brushes, of course!


To start the look, I put some of my paint stick in my palette, and with a damp latex sponge I started applying it all over my face. I took my time doing this, because I wanted to cover all my skin very well and don´t let show any pore at all. Then I set everything with my Prep and Prime podwer by MAC.
After that, with a big eyeshadow brush and Omega eyeshadow by MAC, I started contouring the face. I did a heavy contour on the cheeks, my temples, I put also some of this eyeshadow in my under eye area, I did some contour on my nose too and my jaw line.
Then, with a small shadow brush, I took a little of some red eyeshadow and applied it on my lower and upper lash line, to look sick. With was left of the red eyeshadow on the brush, I applied on the under eye too. I clean that brush, and took some Figure 1 eyeshadow by MAC, and I started to create a very deep dark circle, and after cleaning that brush, I took some Robin´s Egg eyeshadow by MAC and put it on top of the purple, to make the dark circle even more deep. I put this same colors going up a little bit from the tear duct and the side of the nose, as you can see on the picture. This will create an illusion of darkness on the eyes.
In case you don´t want to put blood on your face, another option is to put some purple eyeshadow on your lips (don´t forget to cover your lips with the foundation) and some turquoise (always depending on your skin tone, I need the turqouise, because just with purple it doesn´t look so zombie at all) and you will get a Zombie look.
If you put blood, here´s how I did it. I put some blood on my palette, and then, with a sponge, I started dabing it with small touches, and for creating the effect of the blood falling down my chin, what I did was to take the blood bottle and let some drops fall into the skin; and later fix that with the sponge. I put some black cream to create the effect of dirt.
Of course you can add some zombie contact lenses, but I don´t have it... so it´s more like a natural zombie finish.
And with this, you will be ready to go to the street and start looking for some yummy brains.


Hope you like the post, and see you on the next!
Lor.

-------------------------------

Hola a todos!!

La verdad es que Halloween ya esta muy cerca, así que os voy a dar una idea para un look muy simple y fácil de hacer.

Necesitareis:
Base de maquillaje: Os recomiendo que para este tipo de looks, preferiblemente uséis paint stick, o alguna base que tengáis que se asemeje al acabado que deja el paint stick. El tono que use en este look es un tono mas claro que mi color de piel.
Sangre: cualquier sangre falsa que tengáis, os servirá, esto lo dejo a vuestra elección. Yo usé para este look la Filmblood B de Grimas. Y aqua color negro.
Esponjillas: las necesitareis para aplicar la base y la sangre.
Contorno: Necesitareis una sombra marrón grisácea para el contorno y a parte, usé sombra turquesa, roja y morada.
Polvos sueltos: para fijar todo
Una paleta, que es muy cómoda para poner la sangre, pero no es necesaria si no la tenéis, y por supuesto las brochas!

Para empezar, cogí un poco de paint stick y lo puse en una paleta. Después, con una esponjilla húmeda (no demasiado mojada, porque si no el paint stick se embarra en la cara) fui aplicando la base por toda la cara. Me tomé mi tiempo, porque quería hacer desaparecer todos los poros, y crear una piel sin ninguna imperfección. Fijé todo esto con los polvos Prep and Prime de MAC (podéis usar cualquiera que tengáis, estos eran los que mas a mano tenía en ese momento)
El contorno lo hice con una brocha grande de sombra y la sombra de ojos Omega de MAC. Marqué bastante los pómulos y los laterales de la cara, también hice contorno en la nariz para hacerla parecer mas larga y marqué la mandíbula inferior bastante, para que pareciera mas cadavérico el look.
Con una brocha mas pequeña, también de sombra, apliqué sombra roja (Passionate by MAC) alrededor de los ojos y también añadí un poco de morado, para crear un efecto enfermizo (la sombra morada es Figure 1 de MAC). En la ojera, previamente había puesto un poco de la sombra Omega, y después fuí añadiendo rojo y morado, hasta que quedó una ojera muy pronunciada y añadí un poco de turquesa. Esa misma mezcla de colores lo subí por encima del lagrimal y un poco en el lateral del ojo, para crear una ojera totalmente profunda.
Si no queréis aplicar sangre, lo que podéis hacer es cubrir los labios con el maquillaje también y fijar con polvo. Después aplicáis encima sombra morada, y ya tendríais unos labios de muerto. En mi caso necesité aplicar un poco de turquesa para crear el efecto amoratado que yo buscaba.
En caso de que sí que querais sangre, aqui os digo como lo hice: igualmente apliqué la base para cubrir los labios y fijé con polvos. Después, con la esponjilla fuí aplicando la sangre a toques. Para crear el efecto de la sangre cayendo hacia mi barbilla, lo que hice fue coger la botella de la sangre y dejar caer directamente unas cuantas gotas, y después las iba colocando con la esponjilla a mi gusto. Dí unos cuantos toques de negro para crear el efecto de sangre sucia.
Por supuesto, podeis rematar el look con unas lentillas de zombie, pero como no tengo, digamos que este es un acabado mas natural.
Y con todo esto, ya estareis preparados para salir a la calle e ir en busca de sabrosos cerebros! XD

Fotos como siempre, más arriba.

Espero que os guste y nos vemos en el siguiente post!
Lor.

miércoles, 9 de octubre de 2013

Rick Baker for MAC

Hello there!!

When I hear about this, I almost lost my mind. One of my favourite makeup artist, Rick Baker, was going to make a collaboration with MAC for Halloween. Just in case you don´t know him, he´s one of the best makeup artist in special effects. He did the Thriller video for Michael Jackson, has created a lot of famous monsters in the cinema (MIB, How the Grinch Stole Christmas and he was the assistant of Dick Smith in The Exorcist) and he has been awarded by the Academy Award (if I am not wrong, the Academy created the category of Best Makeup and Hairstyling for him, and he received the award that first year in 1982 for the Werewolf) and his next job is Maleficent, the movie from Disney.

And now, he did this collaboration with MAC, that I know is going to be one of my favourites of the year, for sure. For this collection he recreated 3 looks: a Zombie, the Bride of Frankenstein and a skull from the Dia de los Muertos.

Here are the pictures of the looks and the face charts.


And here are the products and prices (from Spain).

Monster´s Bride Pro Palette 45.10€

Spider Queen Pro Palette 45.10€     

 Chromagraphic Pencil (Black Black, Hi Def Cyan and Pure White) 18.00€

Lip Pencil (Currant and Brick) 15.25€                                           

Lipstick in Cyber 19.00€                                                               

Penultimate Eye Liner in Rapid Black 19.00€                               

Chromacake in Pure White 28.50€                 

Paint Stick in Black Black 24.00€                                             

Paint Stick in Pure White 24.00€                                              

 Monster FX 23.10€                                                                

Face and Body Foundation in White 38.50€                            

 Acrylic Paint in Basic Red 24.00€                                                    

 Acrylic Paint in Black Black 24.00€                                                 

 Acrylic Paint in Landscape Green 24.00€                                         

 Acrylic Paint in Pure White 24.00€                                                 

 Set Podwer in Invisible 26.00€            


I like so much this collection, because almost everything is from permanent line, so if you want to get it again, it won´t be discontinued, and that makes me so happy.

My favourite look so far is the Bride of Frankenstein, is just amazing. In a video, he said that spent a lot of time for creating the wig that the model was wearing, but as you can see on the photo, it looks just perfect.

I hope they could make this every year.

Hope you like the post and see you on the next one!
Lor.

------------------------------------------

Hola a todos!!

La verdad que cuando me enteré de esta colaboración, casi me da algo. Nada más y nada menos que uno de mis maquilladores favoritos, Rick Baker, iba a hacer una colaboración con MAC para Halloween. Por si acaso no le conoceis demasiado, el es uno de los mejores maquilladores en efectos especiales que hay. Creo todo el maquillaje para el vídeo de Thriller de Michael Jackson, ha creado muchos de los monstruos mas famosos del cine (empezó su carrera como asistente de Dick Smith en El Exorcista, ha trabajado en MIB, el Grinch, etc...) y ha sido premiado por la Academia varias veces (si no estoy equivocada, la categoria se creó por él y fue el primer ganador en esa categoría, la de Mejor maquillaje y estilismo, se llevo el premio en 1982 por el Hombre Lobo). Su siguiente trabajo que veremos muy pronto es la película de Disney Maleficent.

Y mientras tanto, ha hecho esta colaboración con MAC, que se que va a ser una de mis favoritas del año sin duda alguna. Ha hecho 3 looks para esta coleccion: un Zombie, la Novia de Frankenstein y una calavera del Dia de Los Muertos.

Las fotos de los productos, face charts y fotos de los looks están mas arriba, como siempre (precios de los productos en España indicados al pie de las fotos).

Lo que mas me gusta de esta colección es que casi todos los productos son de colección permanente, así que si quieres volverlo a comprar, estará disponible. Y eso me hace más que feliz, porque odio que discontinúen productos o sean de edición limitada.

Mi look favorito de esta colección sin duda alguna es el de la Novia de Frankenstein. En un vídeo, contaba que había dedicado bastante tiempo a crear la peluca que llevaba la modelo para darle justo el efecto que el buscaba y que combinase con el look, y como se ve en la foto, queda perfecta!

Ojalá pudieran hacer esta colaboración todos los años.

Espero que os guste el post, nos vemos en el siguiente!
Lor.