lunes, 23 de junio de 2014

All About Matt! by Essence: First Impression

Hola a todos!

Cómo va la semana? Espero que muy bien, y que no estéis pasando demasiado calor... Aunque eso esta un poco complicado, porque mi odiado verano ya empezó oficialmente.

Hoy vengo con un review, aunque podría considerarse una "primera impresión" también la verdad. Después de haber visto bastantes vídeos hablando del producto que os voy a enseñar y de leer muy buenas críticas por diferentes blogs, me decidí a buscarlo (ya que en un par de vídeos, las chicas eran de países de mucho calor y decían que en temperaturas altas aguantaba perfectamente). Me ha costado un poco encontrarlo, pero el otro día finalmente me hice con el All About Matt de Essence.


Son unos polvos compactos que aunque se ven blancos por fuera, obviamente son traslúcidos una vez aplicados en la piel. En la parte de atrás del producto dice que ayudan a fundir los colores de la base y el colorete juntos, que ayuda a mantener un acabado mate y natural todo el día y que es válido para todos los tonos de piel.
En uno de los vídeos que vi, una maquilladora los comparaba con los Prep+Prime de MAC (el tiempo que los usé fueron mis favoritos y no usaba otra cosa para fijar mi maquillaje).


Vivo en Madrid, y sé que hay ciudades mas calurosas en mi país, pero aquí también pega bastante fuerte el calor. Cuando llega el verano, generalmente me es imposible llevara nada mas en la cara que no sea protector soltar, labial y las cejas maquilladas (porque mis cejas naturales están muy despobladas y da penilla verlas sin nada). Pero obviamente, cuando compré estos compactos, al día siguiente me maquillé y los probé. Mi maquillaje aguantó en perfectas condiciones y sin brillos mas de 6 horas. El día siguiente a este, maquillé a dos personas para un evento y el maquillaje de nuevo, aguantó sin problema en ambas durante toda la noche (y el mío aguantó de nuevo 6 horas sin problemas). No contenta con eso, ayer lo volví a usar, y de nuevo mi maquillaje aguantó perfecto y sin brillos.

Leyendo mas detenidamente la composición, porque ni me había parado a hacerlo, vi que llevaban talco. No es de lo mejor que pueda llevar un producto, ya que puede contener otros componentes no recomendables... Pero esta vez voy a hacer de tripas, corazón.


El precio fue de 3.79€, y creo que es muy barato comparado con cualquier otro en el mercado. Pero sobre todo, efectivo.

Así que, si andáis en busca de un producto que realmente mantenga los brillos a raya, os lo recomiendo (a no ser que no queráis cosméticos con talco). Y os lo dice una persona, que en estas fechas se empieza a olvidar del maquillaje hasta que bajan las temperaturas, pero ahora no va a hacer falta.

Espero que os sirva de ayuda y nos vemos en el próximo post!
Lor.

---------------------------------------------------------

Hello guys!!

How´s the week starting? Here the weather is so hot, and the summer oficially started (and I hate summer, I´m not made for hot weather).

Today I am here with a review/first impression post. And very surprised to write something like this so fast!

It took me a little to put my hands on the product, because it was always a sold out, but the other day I found it and bought it. I´m talking to you today about the All About Matt Essence Fixing Compact Powder. All the things that I´ve seen on Youtube and read on blogs was very good reviews and everybody loved it.

The product claims to keep your skin matt and natural all day, to blend blush and foundation colors together, to fix makeup as a finishing powder and is for all skin tones. Although you can see is white, on the skin is translucent.

I tried the product the day after I bought it, and my makeup was perfect for more than 6 hours. The next day I did my makeup and got a little work with two ladies, and I used this powder to set their makeup, and they told me that everything was perfect and there were no shine anywhere. Next day I did my makeup again and I got another 6 hours of perfect makeup with no shine.

Here in my city, now in summer the weather is so warm, and the temperature is so hot ( from 32º to 40º celsius degrees) and find this product I think is going to help me to wear something else that sun cream, lipstick and my eyebrows done in summer.

The only thing is that if you don´t like talc on makeup, stay away from this product, because is the first ingredient that you can see.

But if you can toletare a little bit of talc, I recommend you to give it a chance. I´m doing it and I am so happy with the results.

Photos, above.

Hope you like the post, and I will see you very soon!
Lor.


jueves, 19 de junio de 2014

Melon & Purple Look.

Hola a todos!

Como estáis? Espero que muy bien, y ya preparando el finde, porque con este calor quedarse en casa es mortal...

Bueno, hoy os vengo con un look que me hice hace un par de días, y la verdad que me gustó mucho el resultado. No hace mucho tuve suerte y me regalaron unas cuantas cositas de maquillaje, entre ellas el pigmento Melon de MAC. Ha estado retirado durante mucho tiempo, y ahora lo han sacado en talla de viaje. Es un tono melocotón con toques de dorado y el acabado de este pigmento es un poco frost si no te tomas tu tiempo para fijarlo al parpado.

Sabia que el look quería hacerlo con ese color, y decidí añadir morado y naranja. Una combinación un poco loca de colores, pero vi una foto de un atardecer en tonos naranjas y morados, y me vino esa mezcla de colores a la mente.

Y vamos a por el look.

De base, esta vez estoy probando un pequeño truco usando productos que no son base de maquillaje que he visto a varios maquilladores en YouTube y aun ando en fase de prueba, por lo que usad lo que usaríais en vuestra rutina normal de maquillaje y todo solucionado.

Para este tipo look os recomiendo que aunque sea un poquito, defináis las cejas, veréis que le va a dar un toque totalmente diferente. Yo, como siempre, hice mi rutina usual de cejas con sombra y fijador.

Empezamos con lo divertido.
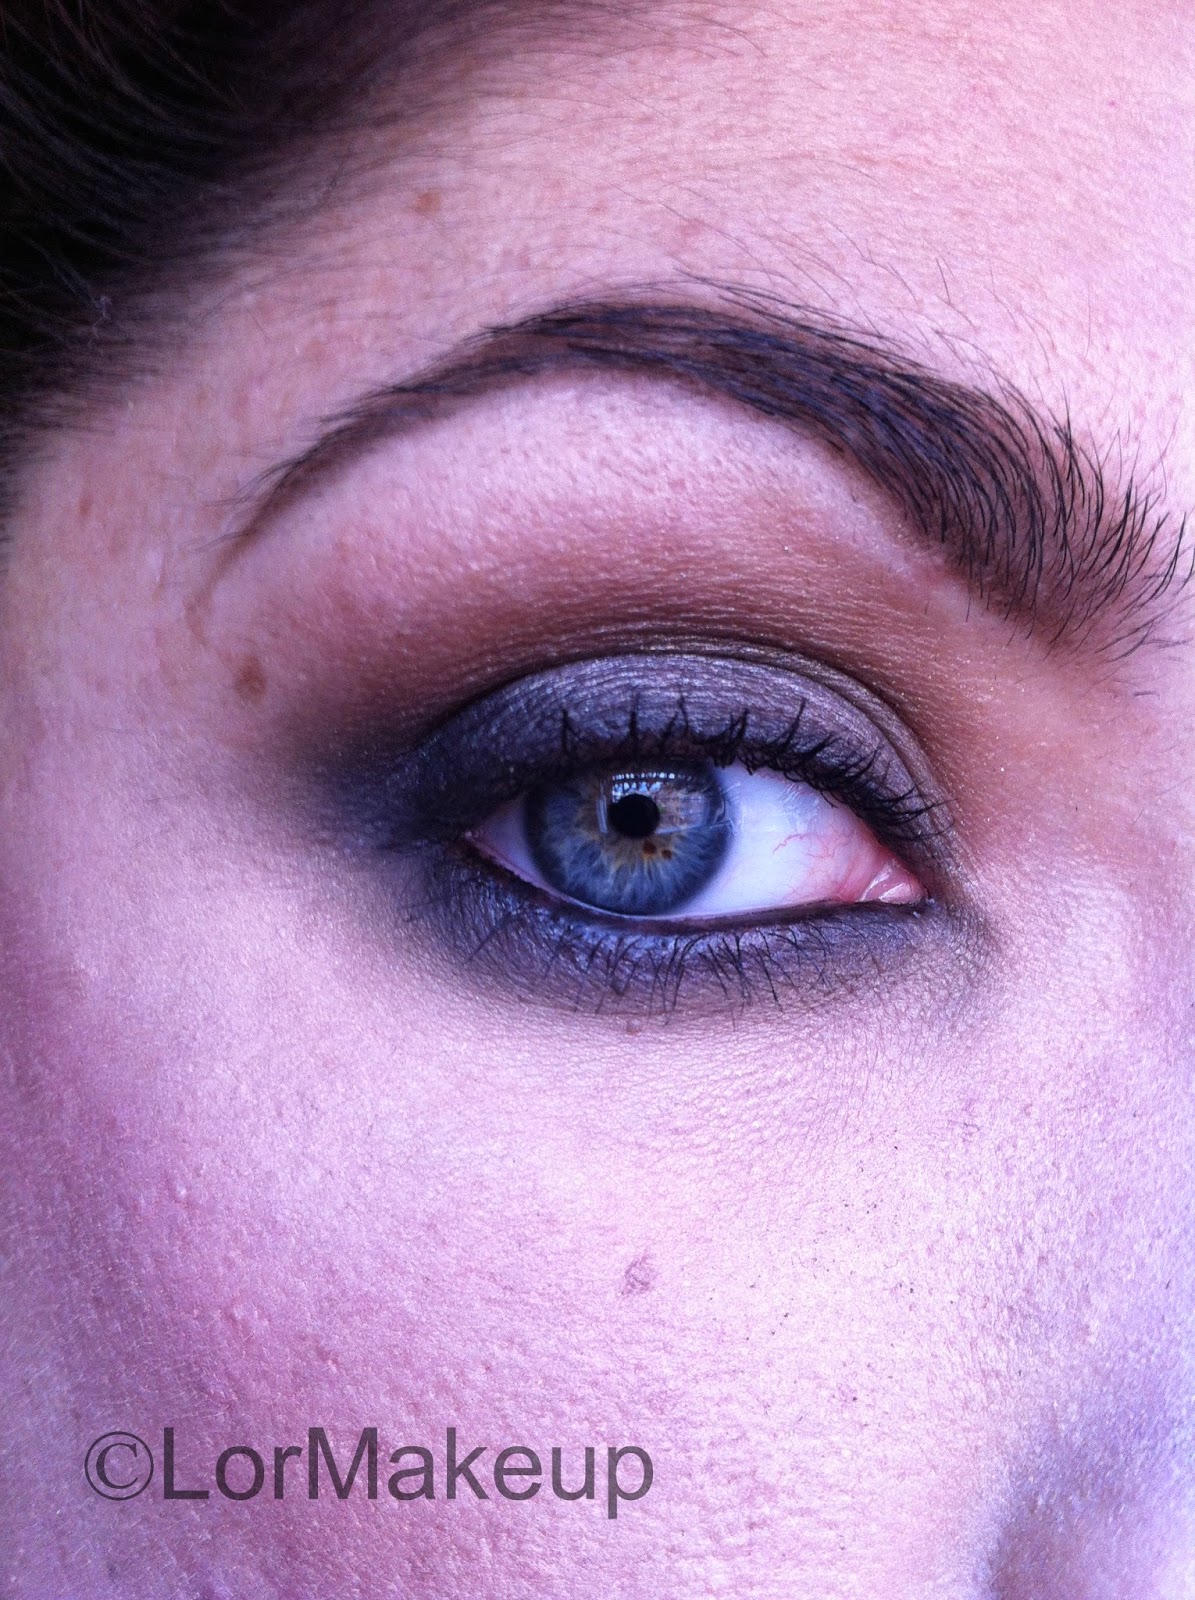
Para base de ojos, usé el paint pot de MAC en Bare Study. Después, apliqué el pigmento por todo el parpado y fijándolo bien a toquecitos, para que no quedase escarchado y se fuera cayendo. Apliqué dos capas, para intensificar el color y que se pudiera apreciar bien. En la parte externa del ojo, y con una brocha difuminadora, fui aplicando el tono #92 de MUFE y lo fui difuminando para mezclarlo bien con el pigmento y que no quedase ningún corte, y por supuesto también en los bordes. Y para darle un toque de naranja al look, por la parte de arriba, apliqué el tono  Red Brick y lo fui difuminando hacia la ceja, pero muy suavemente. De iluminador para la ceja puse un poco de Brulé, en mate, no quería nada con brillo para no quitarle protagonismo al pigmento.
En las pestañas inferiores apliqué el morado y lo difuminé con la brocha que había usado para el naranja previamente, y quedó una mezcla bastante bonita.
Hice un rabillo bastante alargado y delineé por dentro en negro también.


Como siempre, un par de capas de máscara de pestañas.

Para las mejillas contorneé un poco con bronceador y usé un colorete muy natural y suave de tono rosado.

Para los labios, como los ojos eran muy llamativos usé un gloss de L´Oreal, en Rose Melody.

Y este es el look final!


(Foto sin filtro/ No filter photo)


Espero que os haya gustado =).

Antes de irme, una pregunta: ¿preferís solo una foto con todo lo que he usado, o varias? Es para no saturaros con muchas fotos o tampoco poner casi ninguna.

Nos leemos pronto!
Lor.

---------------------------------------------

Hi everyone! Are you getting ready for the weekend? Is almost here! And with this warm weather it´s impossible to stay at home...

A couple of days ago I wore this look, and I was so happy with the result that I thought I will show you how I did it, in case you´re looking for something like this. The main product of this look is a gift that I received the other day, Melon pigment by MAC. This pigment has been discontinued for a very long time here in Spain, but I´m not sure if in the rest of the world was too. And now, here they launched a few ones on the line "Size to go" and Melon is one of the pigments that they´re selling in travel size.

I saw a picture of a dusk in orange, yellow and purple shades. I loved the picture and the colors on it, so I got inspired and created this look.

Use your usual foundation, lately I am trying a new trick for foundation that I´ve seen on a few videos on YouTube and I still testing the results.

For eyebrows, I use my usual routine: eyeshadow and fixer. For this kind of looks, I hardly recommend you to give to your eyebrows some definition, it will make the whole look totally different and better.

Let´s get started with the eyes.
For base I used my paint pot in Bare Study. Then, I applied Melon all over the lid, packing the color very well. I put two layers of pigment, to intensify the color. Then, on the outside corner of the eye, I started building the purple #92 by MUFE and blending it towards the pigment, to avoid any harsh line. I made sure to blend the edges of the purple too. And on top of this colors, I applied some Red Brick eyeshadow to blend the two together and softly blend the orange color to the eyebrow. For highlighting in my eyebrow I used Brulé, I didn´t want to use anything with shimmer.
On the lower lash line, I applied the purple shade by MUFE and blended it with the same brush that I used before for blending the orange color. The mix of that two shades was a curious one, but beautiful.

As always, two coats of mascara.

I contoured a little my cheeks and use a very soft rose pink color for my cheeks.

For the lips, because it was going on so much on the eyes, I decided to use a gloss from L´Oreal in Rose Melody.

And that´s all! Hope you like the finished look, and I will see you very soon.

Photos, above.

See you on the next post!
Lor.


lunes, 16 de junio de 2014

New brushes from Burlesque.

Hola a todos!

Como estáis? Espero que muy bien y que la semana vaya pasando lo mas rápido posible =).

Hoy os traigo un post con nuevas brochas de Burlesque (pinchad y os lleva directo a su página oficial de Facebook). Y estoy muy contenta de escribirlo!


Cuando me enteré que los chicos de Burlesque estaban trabajando en su propia linea de pinceles me fui directa a las nubes, porque sabía que harían los pinceles teniendo en cuenta lo que siempre estamos pidiéndoles o quejándonos de otras marcas que tenemos y no nos acaban de convencer.

No hace mucho, en su Facebook pusieron que ya tenían la línea disponible en la tienda, y unos días después allá que fui, dispuesta a comprar un par de brochas para probarlas.  En cuanto me llegué me dejaron el muestrario y ahí estuve un buen rato mirando y tocando todas. No os podéis imaginar lo que me costó elegir!

Al final, cogí tres brochas.

La primera es esta, la Pro-03. Me gustó para contorno, ya que es muy suave y permite que juegues con la intesidad del producto, y también para aplicar polvo en la ojera, o el iluminador en las mejillas creo que es totalmente perfecta. Es de pelo natural, muy suave pero consistente. Me recuerda mucho a la F35 de Sigma, pero mucho menos puntiaguda (esa brocha nunca me ha convencido por ser tan puntiaguda) y creo que eso evita que puedan aparecer trazos inesperados.


(No he encontrado ninguna foto de la brocha de Sigma sin que tuviera marca de agua de otras personas, si la queréis ver en google tenéis las fotos =D)


La siguiente es una para labios, la Pro-14. Es una brocha de las que yo llamo "doble fibra". Es de punta redonda y bastante corta, lo que ayuda mucho a que a la hora de aplicar un labial o difuminarlo no se te mueva la brocha y te puedas salir del labio. Y para aplicar cualquier otro tipo de producto en crema o en polvo en zonas pequeñas o en un área muy determinada creo que también puede ser perfecta.


No podía evitar el coger una brocha de difuminado, y elegí la Pro-17. Como veis, está terminada en punta, lo que, por ejemplo, a la hora de trabajar zonas pequeñas o muy concretas para difuminar nos va a facilitar mucho el trabajo. Me recuerda mucho a una brocha de MAC imposible de encontrar aquí en España, la 226, pero ahora ya no importa porque tenemos un clon genial!


Y luego, estos chicos que son un amor, me regalaron la brocha Pro-13 de labios. Es una brocha de labios, con tapa. y una vez que le quitas la tapa, la encajas en el otro extremo y sirve de mango. Este tipo de brochas de labios me encanta, porque son perfectas para llevar en el bolso, o una vez que has terminado un trabajo taparlas y evitar que todo se manche de labial. Similar a esta tengo la de Inglot 12S, y con esta brocha tengo una relación amor-odio. La 12S de Inglot es muy cómoda, pero es un poquito mas larga y ancha que la de Burlesque, lo que la hace muy propensa a resbalar en el labio y organizar todo un desastre. Sin embargo, la de Burlesque al ser un poquito mas corta y estrecha te da un poco mas de precisión y hace la aplicación del labial bastante mas cómoda.


Y ya para terminar, cambié mis pinzas para aplicar pestañas sin logo, por las nuevas que tienen con su logo y en negro. También las hay en rosa, pero yo no soy demasiado de ese color.


Además, también estuve viendo los kits de pinceles que tienen para gente que esta empezando en este mundo y me parecieron geniales, muy completos y a un precio que ojalá cuando yo empecé hubieran existido...

Si estáis buscando brochas nuevas, os recomiendo totalmente 100% las de Burlesque. Son brochas de calidad y con un precio inmejorable. Y ademas, con un surtido muy grande que en el futuro va a ser mas grande! Y os prometo que no me pagan por decir esto, lo digo yo porque quiero y son mis impresiones sobre las brochas ;).


Nos leemos en el próximo post!
Lor.

------------------------------------------------------------------------------------

Hi everyone!!

Hope your week started the best way possible, and here I am today with a new post about new brushes, and I am extremely excited about it!

One of my favourite stores of makeup here in my city just launched their own line of makeup brushes, and when I found out about it, I felt extremely happy! The guys from Burlesque (click and it will take you to their official Facebook page) always listen to us when we complain about brushes that we already have and how we would make them better, or which brush would be ideal to have on the kit. So they took all that info, and launched their own line of brushes, and let me tell you that is very awesome!

As soon as I can, I went to visit them and see the brushes on my hands. And I have to tell you that the quality is amazing, and the price is extremely reasonable. Of course, I chose a few ones to add to my kit, and I´m going to show you which ones.

The first one is the Pro-03. Is a small contour face brush. But I see this brush like an all-purpose one. You can contour the face, apply powder on the undereye area, highlighter, etc. The hairs of the brush are so soft and enough stiff to work any product. It reminds me of the Sigma F35, but not so pointy, and I think that´s better, because it can prevent any harsh line that the point of the brush may cause doing contour, for example.

Next one is the Pro-14. This one is a double fiber lip brush. It has a short hair and a very rounded shape. This brush is very precise for lips (for line them and later fill in, because you can control perfectly the brush) and to apply any cream product on small areas it works great.

I couldn´t help to take this one, the Pro-17. This one is a small tapered blending brush. As you can see, it has a pointy end, that makes easier to blend small areas or to work very precisely the crease. This one looks like the 226 by MAC, but here on Spain that brush is not avalaible, but now we have a great dupe!

And then, the guys gave to me this lip brush, because they´re so nice. This one is the Pro-13, a brush with a tap, and when you take it off, you put it on the end of the other part of the brush and it makes a larger handle. This kind of brushes are great to carry on the purse, once you´re finished touching up the lip color, you cover the brush, and you won´t get any lip stains anywhere. Similar to this, I have the 12S from Inglot, and I have a love-hate relationship with that brush. The hairs of the Inglot brush are a little longer than the Burlesque one, and that makes the Inglot brush sometimes so dangerous to work with, because the moment the brush slip on your lip, you make the biggest mess ever. The burlesque brush is shorter, and that gives you more accuracy to work the lipstick.

To finish off, I exchanged my false lashes applier to the one that they have now with their logo and in black. They have it also in pink, but I like black better.

They also have set of brushes for people who´s starting in makeup, and pro kits too, with incredible prices.

So, if you´re looking for new brushes, or you want to start a kit, I hardly recommend you to check the Burlesque brushes, they have a very good quality and a very great price, and of course an amazing quality.

I promise this is my own opinion and thoughts about the brushes 100%, and they don´t pay me to say this, I bought my brushes because I wanted to.

Photos above.

Hope you like the post, and see you on the next one!
Lor.


jueves, 12 de junio de 2014

Inspired Look: Rihanna at CFDA Awards.

Hola a todos!!

Como va la semana? Espero que muy bien, para los que estáis en recta final de exámenes mucha suerte y animo, y al resto espero que el calor no este siendo demasiado malo (para mi ya es horrible, y aun como quien dice no ha empezado "lo bueno").

Hoy vengo con un look que me pareció precioso, simple y tremendamente elegante a pesar de las circunstancias que le rodeaban. Os explico, este es el look que Rihanna llevo a la entrega de los CFDA Awards, donde era premiada por Icono de la Moda.
Y por supuesto, la señorita Rihanna se hizo notar con un impresionante vestido transparente recubierto de cristales Swarovski, muy bonito. El vestido, pero a mi ver ella lo hizo quedar un poco ordinario, ya que el vestido no dejaba lugar a la imaginación.
Antes de que alguien me quiera matar, respeto totalmente que la chica quiera enseñar su cuerpo, pero creo que ya le queda poco para enseñarnos que no hayamos visto previamente.

El vestido sin duda ha acaparado toda la atención, pero sinceramente en cuanto vi un primer plano de su maquillaje se me olvido el vestido, porque el look es precioso! Es un ahumado en tonos plateados, negro y marrón. Y como los ahumados son una de mis técnicas favoritas no he podido resistir la tentación de recrearlo.


Vamos a ello!

Empezamos con la base. La piel de Rihanna siempre se ve perfecta se mire por donde se mire, pero la mia digamos que esta un poco lejos de ser como la suya. Como base voy a aplicar la Face and Body en el tono C1 y después lo fijaré con los Studio Careblend para dar un acabado suave y perfecto a la piel. Como corrector el HD de Nyx, en el tono Porcelaine. Para aplicar la base usé la brocha F80 de Sigma y para el corrector mi esponja de Burlesque, y los Studio con la Powder Brush de Real Techniques.


(Base Face and Body en C1, corrector Nyx en Porcelaine, Studio Careblend en Light, esponja, brocha de Real Techniques y arriba del todo la F80 de Sigma)
(Face and Body foundation, Nyx HD concealer in Porcelaine, Studio Careblend in Light, makeup sponge, Real Techniques Brush and on top the F80 Sigma Brush.)


Las cejas, mi rutina usual de sombra y fijador.


( Sombra Charcoal Brown y fijador de Catrice)
(Charcoal Brown eyeshadow and Catrice brow fixer)


En los ojos aplicamos una prebase para mantener todo en su lugar y que no ocurra ningún desastre. Este es un look muy oscuro y lo ultimo que quieres es que pierda color o aparezcan pliegues. He usado el paintpot de MAC en el color Bare Study. Después, con un tono marrón oscuro he marcado la cuenca del ojo y lo he difuminado hacia arriba, fundiendo bien el color. El resto del parpado que se ha quedado libre es donde he aplicado un tono plata oscuro, y en la esquina exterior del ojo he aplicado negro (y también a ras de las pestañas) para aportar mas definición al ojo.
En la parte inferior del ojo con el mismo tono plata oscuro lo apliqué y difuminé los bordes con el mismo marrón que usé en la cuenca. Y por supuesto, delineación interna en negro.


(Rizador de pestañas, máscara de Astor, paint pot en Bare Study y eyeliner de Nars en Black Valley)
(Sombras de arriba a abajo y de izquierda a derecha: Ground Brown, Knight (edicion limitada), Omega y Brulé)

(Lash curler, Astor mascara, Bare Study paint pot and liner from Nars in Black Valley)
(Eyeshadows from top to bottom and left to right: Ground Brown, Knight (limited edition), Omega and Brulé)


Ricé bien las pestañas y apliqué dos capas de máscara. Podéis aplicar pestañas postizas, yo no lo hice para que pudierais apreciar bien el look en la foto.

En las mejillas he mezclado dos tonos de colorete, un rosa muy clarito y otro un poco mas fuerte con un poco de brillo para conseguir el mitico "glow" look. Y un contorno muy ligero.


(De arriba a abajo y de izquierda a derecha: colorete Stunner, contorno Harmony y colorete Springsheen)
(From top to bottom and from left to right: Stunner blush, Harmony for contour and Springsheen blush)


Y para los labios, delineé con el lápiz de labios Whirl y rellené con el labial Peachstock.


(Lápiz de labios Whirl y labial Peachstock)
(Lip Pencil in Whirl and Peachstock lipstick)


Este es el resultado final, espero que os haya gustado mi interpretación del look =).


Nos leemos en el próximo post!
Lor.

----------------------------------------------------------

Hello there!

How are you doing? Hope that your week is going fine, and for all of you finishing your exams, I wish you the best! And for the rest, hope that your week is not as hot as here in Madrid, Summer finally is coming (and I hate it a lot).

Today I am here to show you my interpretation of the look that Rihanna wore on the CFDA Awards, a few weeks ago. All the people was talking about that incredible dress covered in Swarovski crystals, but the make up caught my full attention after I saw a picture of her face.
I loved the dress, but I didn´t like so much how she wore it, she was showing her soul trough the dress, and I think that  looked so vulgar. But I totally respect that she wants to show her body, after all everyone can show whatever they want to.

Let´s get started with the look!

Her skin is always flawless, but mine is way to far from being like that. So I took my Face and Body foundation and applied it with my F80 Sigma brush. Then some concealer time, under my eyes, using Nyx HD concealer and my dupe of the Beauty Blender Sponge. To set everythin in place, I used my Studio Careblend powder with a Real Techniques Powder Brush.

For the eyes, on this kind of looks, you want to make sure that you use a primer to avoid the eyeshadow creasing and keep everything in place. As my primer, I used Bare Study paintpot all over my lid. Then, with a blending brush, I made a cutcrease with a dark brown shade, slowly building the color and blending it towards the eyebrow. On the lid, I applied a dark silver color all over, and on the outside corner (and all along the top lashes) I add black eyeshadow to make the look deeper and defined. On the lower lash line, I used the dark silver color and blended the edges of that with the dark brown that I used on the crease. For highlight my brow I put some Brule eyeshadow.

After that, I curled my lashes and applied two good coats of mascara. And I line my waterline in black. Of course you can apply falsies, but I didn´t because I wanted that you could see the look properly on the pictures.

For my cheeks I used two different colors, a pale pink and another shade of pink, a little bit darker and with some shine on it, to create a glowy cheek look. And of course, I contoured a little bit using Harmony.

On the lips, I lined them with Whirl lip liner and applied Peachstock lipstick all over.

And this is my interpretation of the look, hope you like it.

Photos, above as always.

See you on the next post!
Lor.


martes, 10 de junio de 2014

Sharon and Kelly Osbourne for MAC.

Hola a todos!

Hoy he recibido por mail la promo de una colección de MAC por la cual estaba muy contenta y tenia unas ganas tremendas de verla! Pero como no todo puede ser miel sobre hojuelas... El otro día me dijeron que la colección no iba a llegar a España, y sinceramente me parece muy injusto que nos tengamos que perder colecciones limitadas sin razón aparente (la de Lorde para MAC solo está disponible venta online, y la colección Playland que es muy colorida tampoco va a llegar).

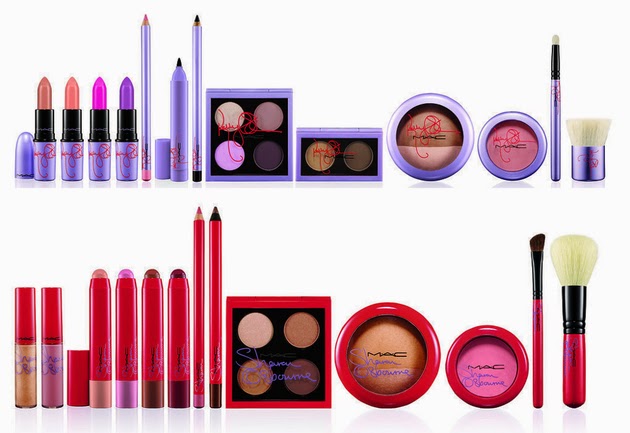
La colección que os enseño hoy es la que han creado Sharon y Kelly Osbourne con MAC (madre e hija, para aquellos que no las conozcáis, Sharon esta casada con el cantante Ozzy Osbourne y Kelly es su hija). Es una colección con tonos muy neutrales, totalmente ponibles y creo que favorecedora para un montón de tonos de piel. El packaging de Sharon es rojo y lleva su firma, y el de Kelly es morado, con su firma también.


Me encanta como usan los colores de maneras opuestas en estos visuales y como podréis adivinar, el color de los packaging es debido a sus colores de pelo.


Empezamos por la coleccion de Kelly:


Labiales "Kelly Lipstick" en los tonos (de derecha a izquierda): Riot House (naranja pastel), Dodgy Girl (lila pastel), Strip Poker (nude) y Kelly Yum-Yum (rosa neón)


"Kelly Lip Pencil" lápiz de labios en el tono "In Synch".


Seguimos con los productos para ojos.


Quad de sombras "Bloody Brilliant" con los tonos (de izquierda a derecha y de arriba a abajo): Spoonful of Sugar (color platino), Tickety Boo (marrón con toques de color ciruela), Fizzy Rose (lila pastel) y Shadowy Lady (ciruela oscuro). 
Duo de sombras para cejas "Kelly Brow" con los tonos (de izquierda a derecha): Soba (gris topo) y Brun (marrón oscuro).

Seguimos con los productos para los ojos, y está el Kelly Eye Khol en el tono Smolder y el Kelly Jumbo Penultimate en el tono Rapidblack.


Ahora, los productos para el rostro.


Colorete "Kelly Powder Blush" en el tono Cheeky Bugger de tono rosado y el  "Kelly Mineralize Skinfinish Duo" en Jolly Good con un tono Beige y un Rosa pálido abajo.

Y terminamos con las brochas de edición limitada, en color morado y con su firma.


La brocha grande es una brocha de bronceador, para todo el cuerpo de corte plano y muy densa, y es la "Kelly 183SE Flat Buffer Brush". La siguiente es una brocha lápiz (o boli, como prefiráis llamarla) y es la "Kelly 219SE Pencil Brush".


Ahora pasamos a la colección de Sharon.


Los labiales "Sharon Patentpolish Pencil" en los tonos (de izquierda a derecha): Innocent (beige nude), Patentpink (lila suave), French Kiss (caramelo) y Ruby ( tono medio rosa, y así lo define la web de MAC).

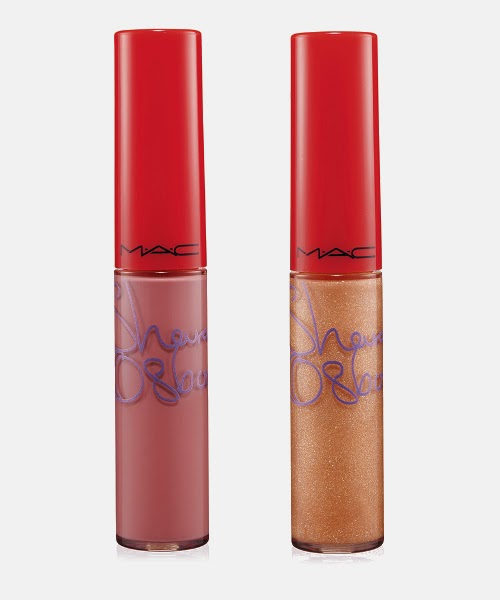
Los Glosses "Sharon Tinted Lipglass": Pussywillow (rosa amoratado) y se refiere al que esta en la derecha, del otro a la izquierda no he encontrado nada!


Lápiz de labios "Sharon Lip Pencil" en el tono Cranberry.


Pasamos a los productos para ojos.


Quad de sombras "Duchess" con los tonos (de izquierda a derecha y de arriba a abajo): Sweet Eyes (dorado nude), Sexy Eyes (bronce), Femme Fatale (marrón dorado) y Embark (marrón rojizo).


Lápiz de ojos "Sharon Powerpoint Eye Pencil" en el tono Bontiful Brown (marrón bronce).


Pasamos a los productos faciales.


Colorete "Sharon Powder Blush" en el tono Peaches&Cream (melocotón rosado) y el "Sharon Mineralize Skinfinish Duo" con los tonos "bronceado con tono melocotón" y un rosa dorado de iluminador.

Para terminar, las brochas de edición limitada en color rojo y con su firma.


La primera a la izquierda, una brocha de ojos de corte angular "Sharon 275SE Medium Angled Shading Brush" y la brocha de la derecha, para aplicar polvos/bronceadores/coloretes "Sharon 167SE Face Blender Brush".


Creo que es una colección muy bonita, y mis productos favoritos sin duda alguna los labiales de Kelly, y los Quads de sombras de ambas. Las brochas también me gustan por tener colores fuera de lo normal.

¿Qué os ha gustado mas de esta colección? ¿Os hubiera gustado que llegase a España?

Nos vemos en el próximo post!!! 
Lor.